Difference between revisions of "NG 900/9-3 Gear Knob Replacement"
| (One intermediate revision by the same user not shown) | |||
| Line 1: | Line 1: | ||
=Overview= | =Overview= | ||
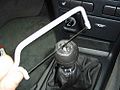
A common problem with the NG900 is the gearknob becoming loose and 'spinning'. | A common problem with the NG900 is the gearknob becoming loose and 'spinning'. | ||
| − | [[file:Gear_Knob_01.jpg|thumbnail|none|]] | + | [[file:Gear_Knob_01.jpg|thumbnail|none|Loose Gear Knob]] |
When this happened to me I decided to replace it with a wooden knob to match the new dashboard I had fitted. Although the replacement knob comes with instructions I have detailed my first hand experience of doing this job so that others can fully understand what to expect when they come to undertake this. | When this happened to me I decided to replace it with a wooden knob to match the new dashboard I had fitted. Although the replacement knob comes with instructions I have detailed my first hand experience of doing this job so that others can fully understand what to expect when they come to undertake this. | ||
| Line 19: | Line 19: | ||
2) Use a screwdriver to pry off the emblem on top of the gearknob | 2) Use a screwdriver to pry off the emblem on top of the gearknob | ||
| − | [[file:Gear_Knob_02.jpg|thumbnail|none|]] | + | [[file:Gear_Knob_02.jpg|thumbnail|none|Removing Emblem ]] |
3) Using the junior hacksaw. Saw a slit in the knob and remove the outer casing. | 3) Using the junior hacksaw. Saw a slit in the knob and remove the outer casing. | ||
<gallery> | <gallery> | ||
| − | file:Gear_Knob_03.jpg| | + | file:Gear_Knob_03.jpg|Sawing Slit in Know |
| − | file:Gear_Knob_04.jpg| | + | file:Gear_Knob_04.jpg|Slit in Knob |
| − | file:Gear_Knob_05.jpg| | + | file:Gear_Knob_05.jpg|Leather Cover Removed |
</gallery> | </gallery> | ||
4) Remove the tape on top of the plastic core to reveal the three snap fasteners for the reverse lock. | 4) Remove the tape on top of the plastic core to reveal the three snap fasteners for the reverse lock. | ||
| − | [[file:Gear_Knob_06.jpg|thumbnail|none|]] | + | [[file:Gear_Knob_06.jpg|thumbnail|none|Reverse Lock Snap Fasteners]] |
5) Insert a screwdriver and release the three snap fasteners. | 5) Insert a screwdriver and release the three snap fasteners. | ||
| Line 37: | Line 37: | ||
The first cut | The first cut | ||
| − | [[file:Gear_Knob_07.jpg|thumbnail|none|]] | + | [[file:Gear_Knob_07.jpg|thumbnail|none|Cutting Plastic Core]] |
You need to be brutal here | You need to be brutal here | ||
| − | [[file:Gear_Knob_08.jpg|thumbnail|none|]] | + | [[file:Gear_Knob_08.jpg|thumbnail|none|Removing Plastic Core]] |
Getting there! | Getting there! | ||
<gallery> | <gallery> | ||
| − | file:Gear_Knob_09.jpg| | + | file:Gear_Knob_09.jpg|Removing Plastic Core |
| − | file:Gear_Knob_10.jpg| | + | file:Gear_Knob_10.jpg|Spring Coming Off |
</gallery> | </gallery> | ||
Off comes the spring | Off comes the spring | ||
| − | [[file:Gear_Knob_11.jpg|thumbnail|none|]] | + | [[file:Gear_Knob_11.jpg|thumbnail|none|Spring Comes Off]] |
Just the core left now. | Just the core left now. | ||
| − | [[file:Gear_Knob_12.jpg|thumbnail|none|]] | + | [[file:Gear_Knob_12.jpg|thumbnail|none|Only the Inner Core Remains]] |
Finally it's off! | Finally it's off! | ||
| − | [[file:Gear_Knob_13.jpg|thumbnail|none|]] | + | [[file:Gear_Knob_13.jpg|thumbnail|none|Everything Removed]] |
=Replacement= | =Replacement= | ||
| Line 63: | Line 63: | ||
3) Lift the bottom of the gaiter up. This is held in place by four srung plastic clips. As I was replacing the gaiter frame I took a picture of just the frame in place to show the clips and their location. | 3) Lift the bottom of the gaiter up. This is held in place by four srung plastic clips. As I was replacing the gaiter frame I took a picture of just the frame in place to show the clips and their location. | ||
| − | [[file:Gear_Knob_14.jpg|thumbnail|none|]] | + | [[file:Gear_Knob_14.jpg|thumbnail|none|Gaiter Removed]] |
4) Refit the spring | 4) Refit the spring | ||
| − | [[file:Gear_Knob_15.jpg|thumbnail|none|]] | + | [[file:Gear_Knob_15.jpg|thumbnail|none|Gaiter and Spring Reinstalled]] |
5) Mix up some epoxy adhesive and apply it to the inside of the replacement knob | 5) Mix up some epoxy adhesive and apply it to the inside of the replacement knob | ||
| − | [[file:Gear_Knob_16.jpg|thumbnail|none|]] | + | [[file:Gear_Knob_16.jpg|thumbnail|none|Epoxy Applied to Replacement Knob]] |
6) The knob has a lip inside it. Push the knob onto the shaft, up to the lip, and rotate it to distribute the adhesive evenly. | 6) The knob has a lip inside it. Push the knob onto the shaft, up to the lip, and rotate it to distribute the adhesive evenly. | ||
| Line 78: | Line 78: | ||
9) Lift up the bottom of the gaiter and press the knob down until the heel of the reverse lock actuator is level with the reverse lock stop. | 9) Lift up the bottom of the gaiter and press the knob down until the heel of the reverse lock actuator is level with the reverse lock stop. | ||
| − | [[file:Gear_Knob_17.jpg|thumbnail|none|]] | + | [[file:Gear_Knob_17.jpg|thumbnail|none|Reverse Lock Actuator and Lock Stop]] |
10) Ensure the "4" is still in line with "R" | 10) Ensure the "4" is still in line with "R" | ||
| − | [[file:Gear_Knob_18.jpg|thumbnail|none|]] | + | [[file:Gear_Knob_18.jpg|thumbnail|none|4 Aligned With R on Reverse Lock]] |
11) Refit the gaiter and leave the adhesive to harden. | 11) Refit the gaiter and leave the adhesive to harden. | ||
| − | [[file:Gear_Knob_19.jpg|thumbnail|none|]] | + | [[file:Gear_Knob_19.jpg|thumbnail|none|Gaiter Refitted]] |
12) Admire your new gearknob. | 12) Admire your new gearknob. | ||
| − | [[file:Gear_Knob_20.jpg|thumbnail|none|]] | + | [[file:Gear_Knob_20.jpg|thumbnail|none|Finished!]] |
Latest revision as of 09:26, 10 August 2010
Overview
A common problem with the NG900 is the gearknob becoming loose and 'spinning'.

When this happened to me I decided to replace it with a wooden knob to match the new dashboard I had fitted. Although the replacement knob comes with instructions I have detailed my first hand experience of doing this job so that others can fully understand what to expect when they come to undertake this.
Time
Approximately 2 hours
Tools required
- Screwdriver
- Junior Hacksaw
- Pilers/Molegrips
- White Spirit
- Epoxy Adhesive (Araldite or similar)
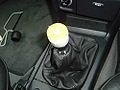
Removal
1) Put the car in neutral
2) Use a screwdriver to pry off the emblem on top of the gearknob

3) Using the junior hacksaw. Saw a slit in the knob and remove the outer casing.
Sawing Slit in Know

Slit in Knob
Leather Cover Removed


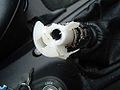
4) Remove the tape on top of the plastic core to reveal the three snap fasteners for the reverse lock.

5) Insert a screwdriver and release the three snap fasteners.
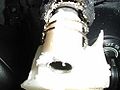
6) Now the hard bit begins. Using the hacksaw cut into the plastic core and tear it off using the pliers and whatever other tools it takes. This is not as straight forward as it may seem. The plastic is tough and you should avoid cutting into the metal tube that the plastic core is fitted to. I cut the outer edges off first and removed the spring before tackling the centre of the plastic core. The pictures should demonstate what I mean.
The first cut

You need to be brutal here

Getting there!
Removing Plastic Core
Spring Coming Off


Off comes the spring

Just the core left now.

Finally it's off!

Replacement
1) Apply plasters to your cut fingers and vacumn up the mess that has been left!
2) Clean the splines of the shaft with white spirit.
3) Lift the bottom of the gaiter up. This is held in place by four srung plastic clips. As I was replacing the gaiter frame I took a picture of just the frame in place to show the clips and their location.

4) Refit the spring

5) Mix up some epoxy adhesive and apply it to the inside of the replacement knob

6) The knob has a lip inside it. Push the knob onto the shaft, up to the lip, and rotate it to distribute the adhesive evenly.
7) Line up the number "4" on the knob with the "R" on the reverse lock actuator.
8) Lift up the reverse lock actuator so that the three catches fasten into the knob.
9) Lift up the bottom of the gaiter and press the knob down until the heel of the reverse lock actuator is level with the reverse lock stop.

10) Ensure the "4" is still in line with "R"

11) Refit the gaiter and leave the adhesive to harden.

12) Admire your new gearknob.
