Hand Brake Cable
The handbrake is controlled by a cable and a return spring attached to a lever which is part of the brake expander. The cable end and spring are visible from above the rear brake rotor with the wheel removed. The brake is set when the lever moves forward, and released when it moves back.
Brake Shoes
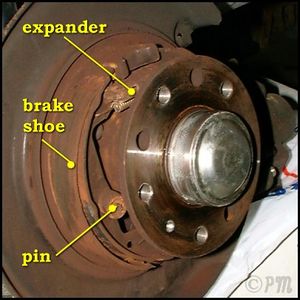
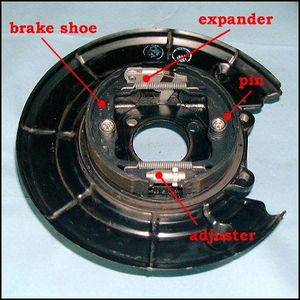
The brake rotor has to be removed to get access to the handbrake. Handbrake shoes and related parts are attached to the wheel backplate, behind the hub.
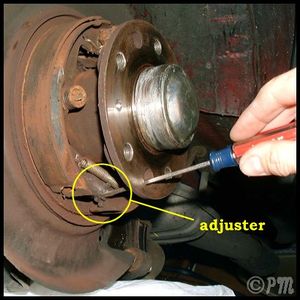
The shoes are attached to the backplate by pins, and held in place by springs. The brake expander is located at the top of the rotor. The handbrake adjuster is located at the bottom.
Hand Brake Adjuster
The distance of the handbrake shoes from the inside of the rotor is set by turning the adjuster wheel, one notch at a time. If the slack in the brake cable is not excessive, the handbrake can be adjusted to release when the handbrake lever is down, and to start to grab when the lever is raised about half-way (~ 5 clicks on the lever).
Inspection
The brake shoes can be inspected for minimum thickness and condition of the shoes. Other parts can be cleaned, and should be reasonably free of rust. The brake shoe shown at left is worn, the shoe lining has separated and was loose inside the rotor.
Components
Assembly
- Lubricate all contact points with brake grease or anti-seize.
- Insert the expander into the slot at the top of the back plate, curved tip of the lever toward what would be the back of the car, and use it as a guide for the brake shoes and the upper tension spring.
- Insert the pins from the back of the plate, then place the coiled springs and cups over the end of the pin. Push the cup and spring down with something like the hollow end of a reversible screwdriver, and turn 90 degrees to lock pin in place.
- Lubricate the adjuster using anti-seize and insert it into the slots at the lower end of the brake shoe.
- Insert the lower tension spring with the help of pliers.
- Hook the cable over the end of the expander lever and make sure the expander is working.
- Insert one end of the expander return spring into the small hole in the lever and the other end into a hole in the back plate.
Information
Tools Used
- Needle nose pliers
- Reversible screwdriver handle
- Brake grease
- Anti-Seize
References
Saab EPC 5-0300
Haynes Ch 9


